From concept to reality: Creating intuitive interfaces for embedded systems. Elevate your UI game with these expert tips for embedded systems 

User Interface (UI) and User Experience (UX) are essential components of any embedded system as they allow users to interact with the device and access its features. 

When UI is designed well, users often don’t notice it. When it’s designed poorly, users may abandon the product altogether. 

Designing effective UI/UX for embedded systems can be challenging, and most designers adhere to certain interface design stages and principles. Below, we explore the four steps for successful embedded UI design:

Step 1: Define the user and their needs 

When designing UI for an embedded system, it’s important to identify your target audience and understand their requirements. This includes user behaviour and preferences. For example, if the system is intended for use in medical devices, the UI should be designed to provide easy, immediate access to critical information, including patient data, vital signs, and alerts.

If the system is intended for use in industrial applications, the UI should be designed to provide easy access to critical information, such as operational data and warnings.

As part of this initial research, some of the other key questions you should seek to answer  are:

  1. What are the user’s needs?
  2. How frequent is that need? 
  3. How does it affect them?

Step 2: Ideate

The ideation phase involves brainstorming and generating ideas for the UI/UX design. During this stage, the design team should consider the user’s needs and preferences, the device’s functionality, and the available display technology. 

It’s also crucial to explore different design options and create rough sketches or wireframes to visualise the interface. The user interface should complement the product and company branding. Embedded software is a significant user touchpoint and it should be consistent with the company’s image.

The design team should also consider the following during the ideation phase:

  • Navigation and organisation of information
  • Color schemes and contrast
  • Font styles and sizes
  • Iconography and graphics

The type of display technology used should also be a consideration as it is a major component of the user experience. A small TFT screen may not be suitable for displaying detailed information, while a larger OLED display may be able to communicate a greater quantity and complexity of data.

Similarly, a display with poor colour accuracy or low contrast may affect the user’s ability to read and interpret information.

Step 3: Prototype

The prototype phase involves creating a preliminary version of the interface to test its functionality and usability. This can be achieved by using rapid prototyping tools to create interactive mockups.

During this phase, you should focus on the following:

  • Navigation flow and user interaction
  • Screen layout and composition
  • Iconography and typography
  • Consistency in design elements

Step 4: Test and evaluate the UI/UX 

The final step in designing an embedded UI/UX is to test and evaluate the interface. This involves conducting user testing to ensure that the interface is easy to use and meets the need it was intended for. It is essential to gather feedback from users and incorporate their suggestions into the final design iterations. 

Final thoughts 

Designing a UI/UX for an embedded system requires careful consideration of the user’s needs, the UI/UX architecture, and the display technology. By following the four steps outlined in this blog post, developers can create an effective UI/UX that meets the user’s needs and enhances their experience. Display technology plays a crucial role in every step of the process, and it is essential to choose the right display technology for the specific application to ensure a successful outcome.

At 4D Systems, we understand the importance of choosing the right display technology for the specific application. We offer a range of display technologies with varying features and specifications, such as capacitive touch, sunlight readability, and wide temperature ranges. We can help you create an effective and intuitive UI/UX design for their embedded system.

Share this on socials!

Subscribe to our newsletter

Latest Case Studies

  • This case study unveils a practical application of embedded innovation, highlighting the process and outcomes of upgrading legacy systems in a technology-focused product line. Through strategic technological integration, the project not only uplifted product performance but also markedly improved customer satisfaction levels. The subsequent pages delve into various strategic and operational enhancements made, providing readers with a nuanced understanding of the concrete impacts and subtleties involved in a real-world, engineer-led embedded innovation initiative. A testament to blending traditional systems with modern innovation.

    Published On: October 12, 2023|Categories: Appliances|
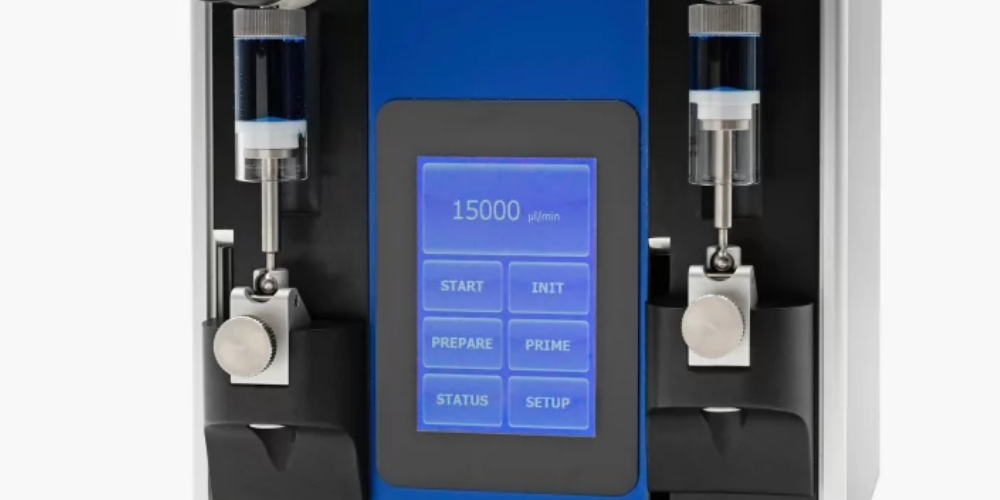
  • Duratec, specializing in liquid handling devices for various industries, aimed to simplify the control interfaces of their new product line. Partnering with 4D Systems, they integrated a touch display module enhancing user-centricity and operational efficiency. This transition replaced outdated control panels with an intuitive, modern interface without compromising on control capabilities via the RS232 interface. Three new devices were launched, improving user interactions through user-friendly touch displays, showcasing Duratec's commitment to innovation. This collaboration allowed for more straightforward control, monitoring, and interaction with Duratec's devices, ensuring a better user experience and meeting industry demands.

    Published On: August 14, 2023|Categories: Appliances|
  • In the challenging process of creating an advanced 3D printer, BCN3D encountered an unexpected difficulty: finding an appropriate, user-friendly display module. Despite initial struggles, BCN3D discovered the solution in 4D Systems’ gen4 display modules. These modules offered superior resolution, processing power, and flexibility. Key to BCN3D's decision was the modules' easy integration via a serial connection and the Arduino-compatible library into their firmware. For its Sigma R17 3D printer, BCN3D upgraded to the gen4-ULCD-35DCT-CLB, a 3.5-inch Intelligent TFT-LCD display module with capacitive touch, further enhancing the user experience. The gen4 series of intelligent display modules perfectly matched BCN3D's requirements, offering innovative solutions in the sophisticated 3D printing space.

    Published On: July 18, 2023|Categories: Appliances|