13 09, 2023

No RS485 in your display processor? Here’s a solution

2023-09-29T23:12:07+10:00Categories: Display Technologies|Tags: |

4D Systems’ MOTG-RS485 accessory module adds RS485 communication on your next display application.

RS485 holds significant importance in industrial applications due to its ability to facilitate long-distance communication. This serial communication method is designed to operate over extended cable distances. This makes it an ideal choice when devices are spread out over considerable distances within an industrial setting. RS485 communication is widely used in manufacturing, medical, retail, and commercial industries, even those involving high-quality display modules and processors.

When we say that the display processor does not support the RS485 serial communication method, it means that the system is limited from being used in scenarios where long-distance communication is required.

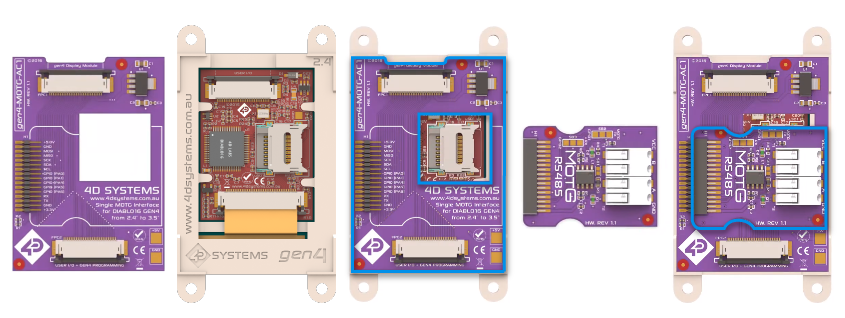
4D Systems has designed an accessory board for equipping various gen4-uLCD displays with an RS485 module. For example, the MOTG-AC1 can be used as an interface board to connect a MOTG module to Diablo16-based gen4 display modules easily. Similarly, we offer MOTG-AC2, MOTG-AC3, and MOTG-AC4 to feature single/dual MOTG slots depending on the module size and processor used.

In this article, we will discuss the fundamental aspects of RS485 and its relevance in industrial display applications. Furthermore, we will explore the innovative solution provided by 4D systems through their MOTG-RS485 accessory module in implementing RS485 serial communication support in all gen4 micro LCD displays.

Basics of RS485 serial communication protocol

As mentioned earlier, RS485 communication is a serial communication method used for point-to-point communication among electrical devices, similar to USB and Ethernet, and is widely adopted in industrial applications. The RS485 communication method facilitates communication between a master and multiple slave devices in the network, where several slaves can be connected to the bus. While RS485 can support point-to-point communication, it is typically used with multiple slave devices.

Within the OSI model (Open Systems Interconnection) which defines the different layers of a communication system from the application to the physical layer, RS485 operates at the physical layer. The physical layer of the OSI model is responsible for facilitating data transfer between a device and a physical transmission medium.

The RS485 serial communication is not only for its long-distance data transmission capabilities but also for its resilience in electrically noisy environments. In RS485 communications, two types of noise can occur– differential noise and common mode noise.

While common mode noise generally has minimal impact, it is essential to implement the right circuit design techniques to minimize differential noise. In commercial applications, a twisted pair cable is used for RS485 communications to mitigate electrical interference. Each differential RS485 signal transceiver should be connected to the corresponding wires of the twisted pair, reducing the effects of electrical interference.

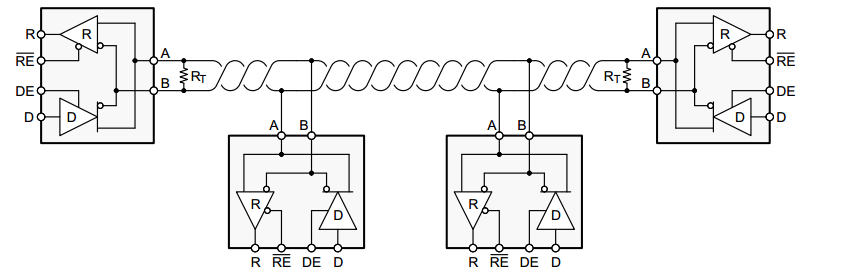
In a standard RS485 communication system using a twisted pair cable, the master device, acting as the host computer , initiates communication by sending a signal through its TX wire to establish a connection with the slave devices on the network. Subsequently, the master device transmits commands to the end device, for example, a motor controller to control speed or direction, which, in turn, receives the signal through its RX wire connected to the same twisted pair cable.

The RS485 communication offers versatility in display applications due to its advantages over other serial communication methods. 4D Systems has provided support to its gen4 micro LCD displays through the integration of the MOTG-RS485 accessory module into the advanced display system.

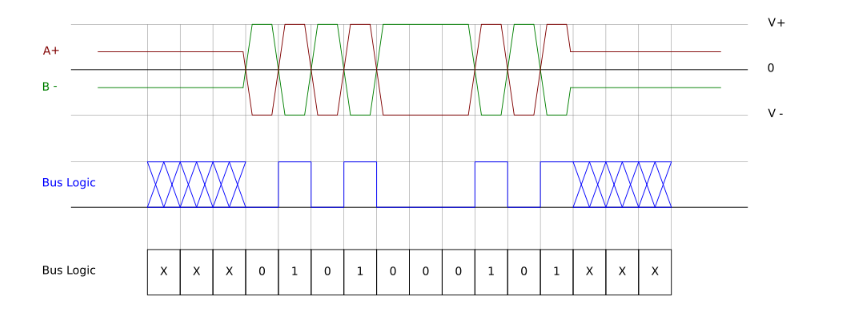
The above image depicts how an RS485 signal is observed on an oscilloscope. RS485 uses a differential signaling technique, where the same data is transmitted on two wires (A+ and B-) but with opposite polarities. When logic 1 is present on one wire, the other wire carries a logic 0.

To enable high-speed data transmission over long distances, these two opposing signals are transmitted through a twisted pair of wires. The advantage of this arrangement is that any noise induced on these lines affects both signals equally but in opposite directions, effectively canceling out the noise.

Add-on module to support RS485 communications

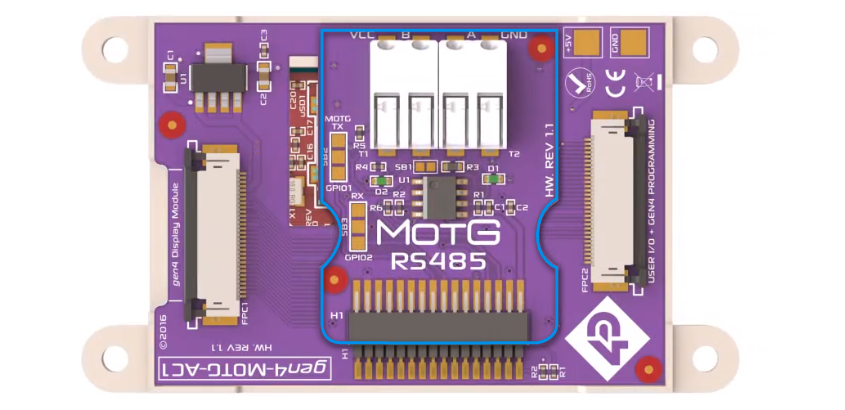
We developed the MOTG-RS485 module to offer a high-speed and low-cost solution that plays an important role in facilitating the integration of RS485 serial communication protocol in almost any of your intelligent display applications.

The MOTG-RS485 add-on module integrates the STMicroelectronics’ ST1480ACDR differential line transceiver, which operates using a 3.3V power supply for RS485 and RS422 communications. This transceiver configuration consists of a single driver and receiver, supporting half-duplex functionality. As a result, the module can alternate between transmitting and receiving data as required. With its robust capabilities, the transceiver enables reliable data transmission over long distances, even in electrically noisy environments.

Master and Slaves (RS485)

gen4 HMI 4.3″ Display Connected with the MOTG-AC4 Adaptor and MOTG-RS485 Module

What is 4D Systems’ MOTG approach?

4D Systems introduced the Modules-on-the-Go (MOTG) concept, enabling the seamless expansion of system capabilities for embedded designs involving display applications. This concept revolves around simple plug-and-play hardware modules that can be easily added or removed. This approach is aimed to eliminate the need for complex soldering, simplifying assembly and maintenance processes.

Conclusion

There you go. Now you can get your hands on the 4D Systems Modules-on-the-Go (MOTG) and add support for Wi-Fi, Bluetooth, RS485, RS232, CANBUS, and MP3 audio sound to your next display application.

The 4Discovery Range is also available as an option that supports RS485.

Until next time.

13 09, 2023

[Webinar Recording]
Advancing Critical Care with Intelligent Displays

2023-10-04T19:55:37+11:00Categories: Display Technologies|Tags: |

Advancing Critical Care with Intelligent Display Next Phase 3D Printed Advanced Anatomical Medical Mask 

If you missed our recent webinar on the future of critical care technology, here’s a brief rundown of the game-changer that had everyone talking: The 3D-printed Advanced Anatomical Medical Mask, known as the ‘Amarysia Artemis’.

A Glimpse into the Amarysia Artemis

During the webinar, we were introduced to the cutting-edge Amarysia Artemis. Designed specifically for ICUs, this isn’t your typical medical mask. With its integrated bio-sensor capabilities and an innovative embedded display, it’s set to revolutionize the way healthcare professionals access vital medical information. Doctors, nurses, and surgical teams can now view real-time critical data directly on the mask during operations and clinical applications, minimizing distraction and streamlining the process.

Meet the Brain Behind the Breakthrough

A highlight of the webinar was hearing directly from Leonardo Bilalis, the PhD student at the University of Piraeus behind this groundbreaking project. His passion for improving healthcare processes and patient care was palpable. Bilalis envisions a world where immediate and accurate medical data is always at hand, drastically enhancing medical decision-making. His insights on the development process, challenges, and aspirations for the Amarysia Artemis were truly inspiring.

Missed the Webinar? Catch the Recording!

While this recap provides a brief overview, the depth and breadth of information covered in the webinar about the Amarysia Artemis and its implications in the medical field were extensive. If you’re an engineer or simply someone passionate about the intersection of tech and healthcare, you won’t want to miss out.

For a comprehensive understanding and to see the Amarysia Artemis in action, we invite you to watch the full recording.

Until next time.

3 09, 2023

Careful there! Your guide to touch screen care.

2023-09-30T02:03:32+10:00Categories: Display Technologies|Tags: |

As touch screens become more prevalent in our daily lives, it’s important to understand how to properly care for them to maximise their accuracy, performance and longevity.

Touch screens are essential components in many modern electronics, from smart home control to industrial equipment. However, these touch screens tend to be fragile and sensitive, making it crucial to handle them with care. Improper care can lead to scratches, diminished sensitivity, and compromised accuracy. Therefore, it is essential to maintain these advanced touch screens diligently to ensure they remain in their best condition, allowing us to experience smooth and uninterrupted operation.

This comprehensive guide aims to provide you with a thorough understanding of various methods for caring for touch screens. Within this article, we will explore practical tips on how to protect, clean, and maintain your touch screen devices. By implementing these strategies, you can ensure that the touch screens of your digital computing systems stay responsive and efficient, ultimately enhancing your productivity and overall user experience.

Clean Your Touch Screen Regularly

Your touch screen is the primary interface between you and the computing system. However, regular usage can cause it to accumulate dirt, and oils from your fingers that can affect its functionality.

The first step in touch screen care is to clean it regularly. This is how we recommend cleaning your touch screen:

  1. Turn off the device: Before cleaning your touch screen display, turn off the device to avoid accidentally triggering any functions while cleaning.
  2. Choose the right material: Use a soft, lint-free cloth, such as a microfiber cloth, to clean the screen. Avoid using abrasive materials such as paper towels, tissue paper, or rough fabrics, as they can scratch the screen.
  3. Dampen the cloth: Dampen the cloth with water or a mild cleaning solution specifically designed for touch screens. Do not use harsh chemicals, such as ammonia-based cleaners, alcohol, or vinegar, as they can damage the protective layer of the screen.
  4. Clean the screen: Gently wipe the screen with the damp cloth in a circular motion, starting from the top of the screen and working your way down. Be careful not to apply too much pressure, as this can damage the screen.
  5. Dry the screen: After cleaning, use a dry, soft cloth to wipe the screen dry. Do not use a hairdryer or other heating device to dry the screen, as this can damage the display.

Handle with Care

Handling your touch screen devices with care is important to preserve their lifespan and performance. The touch screen is vulnerable to the following damage–

  1. Avoid excessive pressure: Touch screens function based on the slight electrical changes caused by your fingers. They are not designed to withstand high pressure or harsh impact. Consistently applying too much pressure or force can lead to cracks, dead pixels, or even total screen failure. Use only your fingers or a stylus designed specifically for touch screens.
  2. Prevent sharp objects: Sharp objects such as pens, pencils, keys, or any pointed items can easily scratch or pierce the screen. These damages are often irreversible and can significantly affect your device’s performance. Avoid the temptation to use these objects.
  3. Avoid extreme temperatures: Touch screen devices are sensitive to temperature extremes. High temperatures can cause your device to overheat, which can damage the screen and internal components. On the other hand, exposure to very cold conditions can cause the screen to become less responsive or even malfunction. Always try to keep your device in a moderate, room-temperature environment. Avoid leaving your device in hot cars, near heaters, or in direct sunlight for extended periods. Similarly, avoid using your device in freezing conditions.

Calibration

Calibration is important for Resistive touchscreen displays

Calibration becomes important, particularly in industrial applications, where accuracy and precision are essential. It ensures that the touch screen accurately detects touch and responds accordingly. When a touch screen loses its calibration, it can affect the accuracy of touch detection and result in incorrect input or unresponsive screens. 

In particular, resistive touch screens, when pressure is applied to the surface of the touchscreen through a finger, the two resistive layers come in contact at the point of the touch. This change in electrical current serves as a signal to prompt the device to carry out the required action. Consequently, calibration becomes crucial for resistive touch screens in order to ensure precise responsiveness to user input

On the contrary, capacitive touchscreen use electrodes that change the electrical capacitance when a conductive object touches the screen. In the manufacturing process, capacitive displays use glass material, which allow them to withstand more pressure impact. 4D Systems capacitive touchscreen panels cannot be calibrated because of this underlying technology and operation.

There is a need for direct human skin contact with capacitive touchscreens that restricts their ease of use, unlike resistive touchscreens. For instance, capacitive touchscreens do not support usage of external leather gloves, a limitation that is not applicable to any resistive touchscreens. 

Calibration aligns the touch screen coordinates with the system coordinates. Calibrating your touch screen periodically or as recommended, helps ensure that the touch screen accurately detects touch, responds promptly, and delivers precise results.  

Firmware Updates 

To keep your touch screen firmware updated, regularly check for updates through your device’s settings. Make sure that the device is always backed up with your data before initiating a firmware update, as an update process can sometimes lead to data loss if there’s an issue during installation. Additionally, ensure that your device is connected to a reliable power source before starting the update, as the process can consume a significant amount of power. 

Firmware updates addresses several of the following issues– 

  1. Bug fixes: Firmware updates often address known issues or bugs that could be affecting your touch screen’s performance. This could include fixes to unresponsive areas on the screen, issues with screen rotation, or problems with certain touch gestures. 
  2. Feature additions: Firmware updates may also introduce new features or improvements to existing features on your touch screen device.  
  3. Software compatibility: Regular firmware updates ensure that your touch screen remains compatible with the latest software, offering you the best user experience. 

Complete Setup to Update the Firmware

To ensure the optimal performance of your 4D Systems display module, and in order to enable the latest feature releases, it is highly recommended to load the latest firmware. This means at the time of development, PmmC for Picaso, Pixxi, Goldelox, or PmmC plus Display Driver for Diablo. 

The PmmC (Personality Module Micro-Code) serves as the operating system for the device, incorporating the Extensible Virtual Engine runtime and a comprehensive instruction set that can be programmed using the Workshop4 Software IDE

In addition, the display driver (4DRV) is responsible for controlling the display and can be independently upgraded. This means that you can update the display driver at any time without impacting existing applications or stored data in the memory banks or the PmmC

These firmware updates aim to keep your display safe, ensuring its functionality, security, and compatibility with the latest advancements and improvements. By providing regular updates for both the PmmC and display driver, we enable you to maintain a secure and reliable display experience without any disruptions to your existing applications or data. 

Proper Storage

In addition to all of steps mentioned above, proper storage of the touch screen device can have significant impact on the performance. 4D Systems have also provided display specifications of gen4 display modules, where the customer can understand further on for storage temperature and operating voltage.

So there you have it. Following these simple steps can help you keep your touch screen clean and responsive. Regular cleaning will ensure the longevity of the device, and taking proper care will only maximise their accuracy and performance for the life of your end-application.

As always, for any further questions or if you’d like to discuss more, don’t hesitate to reach out to our engineers and support team.

Until next time.

31 07, 2023

Faster, Smarter, Stronger: Uncovering the gen4 intelligent displays

2023-09-29T19:59:18+10:00Categories: Display Technologies|Tags: |

gen4 intelligent display modules offer a modular design approach for simpler application development and faster time-to-market.

Embedded Displays: The Unseen Catalysts of Technological Interaction

Every day, we encounter embedded displays that blend effortlessly into our daily routines and activities. These displays, although often unnoticed, are discreetly incorporated into the complex devices we rely on, extending beyond just smartphones, televisions, and other large electronics. Whether it’s in our homes, workplaces, or public areas, these small but crucial displays play an important role in our interactions with innovative technology.

In our everyday coffee routine, we depend on the digital interface of our coffee machine to customize our brew. These tiny embedded displays, though often ignored, offer us a seamless and intuitive way to interface with the devices, effortlessly transforming a once complex process into a simple experience.

In addition to their domestic applications, these displays serve as the foundation for numerous industrial monitoring systems. Whether it’s ensuring machinery operates under optimal conditions, monitoring environmental factors, or managing production lines, these embedded displays offer essential real-time information.

In our ever more interconnected society, embedded displays are used by home automation systems to create intelligent and engaging living environments. From thermostats to security systems and automation interfaces, these displays not only offer crucial information but also enable us to configure and manage our devices. With their user-friendly design, they simplify the control and customization of our living environments in a straightforward manner.

However, it is crucial for manufacturers to carefully select the appropriate display that meets all the required specifications and interaction capabilities. Equally important is the inclusion of robust system-on-chips within the intelligent embedded display modules, as they are responsible for powering the entire system and delivering a smooth interactive experience to the user.

This article aims to examine whether the gen4 series of intelligent display modules, which are driven by processors from 4D Systems, are suitable for meeting your specific application needs.

The Family of gen4 Display Modules – What Are They?

After gaining valuable on-field experience across various industries, 4D Systems has successfully created the gen4 series of intelligent display modules. This versatile and highly regarded display platform has been developed based on widespread adoption of intelligent LCD display devices in different applications and the successful implementation of numerous customer projects in commercial settings.

The series comes with a diverse range of sizes and touch capabilities to cater to different needs. These modules are purposefully designed to integrate efficiently with a wide range of host microcontroller units and processors, including those with limited pin counts.

The gen4 series offers impressive features suitable for both industrial and home applications. They provide the convenience of choosing between resistive touch or capacitive touch options. Powering these gen4 display modules is the company’s own Diablo16, and Picaso, and Pixxi graphics processor, which delivers a multitude of functionalities and options for designers, system integrators, and end-users.

A compelling reason to opt for gen4 series intelligent embedded display modules is the availability of pre-developed and validated drivers, primitives, and GUI functions. This allows the host microcontroller to offload display-related tasks, freeing up system resources for primary applications. Consequently, users can concentrate their efforts on GUI design without getting bogged down in time-consuming low-level development tasks.

In terms of software, the modules are equipped with integrated development environments (IDEs) that simplify the GUI design process. These user-friendly IDEs offer intuitive drag-and-drop functionality, facilitating fast prototyping and application development without the need for extensive coding.

The gen4 series display modules adhere to a modular design approach. Utilizing this modular design, it becomes evident that application development becomes significantly simpler and more straightforward when compared to a discrete design. As a result, the time to market is reduced, enabling faster product deployment

Why Choose gen4 Human-Machine Embedded Displays?

In this section of the article, we will explore some of the noteworthy characteristics of gen4 intelligent display modules. These modules emerge as an ideal and go-to option for seamlessly integrating small displays into embedded applications on a large scale.

1. Powerful Embedded Processor

When considering a smart display module, the initial aspect to consider is the host microcontroller or processor, as it determines the module’s performance and efficiency. The graphics processor developed by 4D Systems offers exceptional functionality as both a standalone embedded graphics processor and as an interface to almost any host controller, functioning as a graphics co-processor. These gen4 HMI modules are equipped with 4D Labs Graphics Processors.

Designed for easy integration with a variety of OLED and LCD display panels, the custom-embedded 4DGL graphics controllers offer exceptional compatibility and functionality. Among these controllers, the Diablo16 stands out as a more powerful option compared to the Picaso and Pixxi variants. It boasts superior flash storage, random access memory, and graphic capabilities. This explains why 4D Systems offers a wide range of gen4 displays powered by the Diablo16 processor, as it enables impressive graphics, text rendering, image processing, and animation capabilities.

2. Range of Sizes and Touch Capabilities

4D Systems provides a diverse selection of display sizes, ranging from 2.4 inches to 7 inches, allowing users to choose the ideal display size based on their specific application needs. In terms of availability, the Picaso processors are limited and come in three sizes (2.4 inches, 2.8 inches, and 3.2 inches). On the other hand, the Diablo16 and Pixxi modules offer a wider range of sizes, starting from 2.4 inches and going up to the 9-inch format.

The next consideration is determining the most suitable interaction type for your desired application. These display modules present a variety of options, including non-touch, resistive touch, and capacitive touch variants. Capacitive displays are often preferred by manufacturers for their advanced and intuitive touchscreen experience.

When selecting the appropriate display type, it is crucial for users to assess the application parameters and the expected level of user interaction. This evaluation simplifies the process of choosing the right display module for their specific needs.

3. Support for Popular Hardware Interfaces

4D Systems acknowledges the widespread adoption of Arduino and Raspberry Pi hardware platforms across various industries due to their well-established ecosystems and extensive network of trusted design partners.

To cater to this demand, the gen4 series of intelligent display modules are fully compatible with both these popular and widely used hardware devices. This compatibility provides customers with increased flexibility and options to customize their displays, allowing them to maximize performance for their specific applications.

4D Systems has designed the gen4 HMI modules to efficiently integrate with almost any host processors or platforms. Recognizing the extensive utilization of Arduino and Raspberry Pi hardware platforms in various industries, thanks to their well-established ecosystems and reliable network of design partners, the company has developed software libraries that cater to these popular hardware platforms. This includes comprehensive support for Rock and BeagleBone, enabling smooth integration between the gen4 HMI modules and these widely adopted platforms.

4. Mounting Options

4D Systems offers the convenience of 3D printable enclosures, which are designed to simplify the process of mounting display modules on walls, panels, or within larger enclosures. This feature enables the overall usability and installation options for integrating the gen4 series display modules into various applications.

For example, consider the application of a home automation system where the gen4 series display module requires mounting on a wall, serving as a centralized control panel for managing numerous smart devices within the home. This scenario exemplifies the versatility of utilizing 3D printable enclosures alongside gen4 display modules, showcasing their ability to enhance the functionality and aesthetics of diverse applications.

5. Aesthetic Design With Protection

In addition to enhancing the aesthetics of the device and screen, 4D Systems incorporates a cover lens bezel, which offers not only cosmetic value but also practical benefits. These advantages include providing protection for the display, facilitating easy replacement if needed, securely holding the components in place, and improving overall usability. It is important to note that the cover lens bezel is available for all gen4 display modules featuring capacitive touch and non-touch functionality resistive touch functionality.

By incorporating a bezel, an additional layer of protection is provided to the device’s screen, effectively shielding it from external impacts. The integration of bezels serves the purpose of minimizing unintended interactions with the display, ensuring an intuitive a more easy user experience.

How Is a gen4 Display Module Used In a Commercial Coffee Machine?

South African coffee machine manufacturer, Henlo, recently utilized a 4D Systems gen4-uLCD-43DCT-CLB display module with an embedded Diablo16 processor and a capacitive touch panel. Additionally, the manufacturer opted to also use two 1.3” round pixxiLCD intelligent display modules, which feature the embedded Pixxi-28 processor and a capacitive touch panel complete with a cover lens bezel.

According to Henlo van der Westhuizen, the designer, incorporating these screens as input/output components adds a comprehensive software layer between customers and the machinery. This integration ensures customer satisfaction even in the presence of minor issues that may arise during operation.

After carefully considering the coffee machine’s display needs, Henlo van der Westhuizen identified the importance of having a glass bezel for the display, which effectively protects the screen from moisture exposure during the coffee brewing process. Leveraging the robust GUI tools offered by 4D Systems, Henlo’s designers gained the flexibility to create an interface that precisely met their customers’ expectations in terms of aesthetics and functionality.

Henlo, South Africa:Henlo Premium Espresso Machine

Can gen4 Be Used In The Healthcare Industry Too?

CEiiA, a Portuguese research and development firm, responded to the challenges posed by the Covid-19 pandemic by creating Atena, an invasive medical ventilator.

This innovative device incorporates key components, including the 7.0-inch gen4-uLCD-70DT display and the gen4-BEZEL-70B, sourced from 4D Systems. These display components play an essential role in the functionality and operation of the ventilator. “We required the graphic display to be intuitive, easy to program, feature-rich, and most importantly, reliable for the project. The gen4-uLCD-70DT met all of these conditions, and we programmed it using the 4D Workshop4 Pro IDE and Visi Genie environment,” says Tiago Rebelo, director of the Product and Service Development Unit at CEiiA, the Centre of Engineering and Product Development.

The team acknowledges the remarkable achievement of completing the development within an accelerated timeframe of just 45 days, largely attributed to the utilization of readily available display modules from the gen4 series. Leveraging these off-the-shelf display modules, CEiiA managed to manufacture around 1,000 units of the initial ventilator version, meeting the local demand for this critical medical equipment.

CEiiA, Portugal: Atena Invasive Medical Ventilator

There You Have It, a Proven Performer.

In conclusion, the 4D Systems gen4 series of intelligent display modules are proven to be a valuable addition to your applications across industries. These modules excel in their ability to seamlessly integrate, exhibit compatibility with different hardware platforms, and provide a wide array of display sizes and interaction options, making them highly versatile for commercial applications. With their powerful processors and robust functionality, they continue to drive innovation and efficiency within the embedded display industry.

For more details regarding the range of gen4 display modules, additional information can be found on our website. If you require assistance in selecting the most suitable display module for your needs, please feel free to contact us for expert support and guidance.

Until next time.

29 06, 2023

4 Steps for Embedded UI Design

2023-07-27T19:09:44+10:00Categories: UX/UI|Tags: |

From concept to reality: Creating intuitive interfaces for embedded systems. Elevate your UI game with these expert tips for embedded systems 

User Interface (UI) and User Experience (UX) are essential components of any embedded system as they allow users to interact with the device and access its features. 

When UI is designed well, users often don’t notice it. When it’s designed poorly, users may abandon the product altogether. 

Designing effective UI/UX for embedded systems can be challenging, and most designers adhere to certain interface design stages and principles. Below, we explore the four steps for successful embedded UI design:

Step 1: Define the user and their needs 

When designing UI for an embedded system, it’s important to identify your target audience and understand their requirements. This includes user behaviour and preferences. For example, if the system is intended for use in medical devices, the UI should be designed to provide easy, immediate access to critical information, including patient data, vital signs, and alerts.

If the system is intended for use in industrial applications, the UI should be designed to provide easy access to critical information, such as operational data and warnings.

As part of this initial research, some of the other key questions you should seek to answer  are:

  1. What are the user’s needs?
  2. How frequent is that need? 
  3. How does it affect them?

Step 2: Ideate

The ideation phase involves brainstorming and generating ideas for the UI/UX design. During this stage, the design team should consider the user’s needs and preferences, the device’s functionality, and the available display technology. 

It’s also crucial to explore different design options and create rough sketches or wireframes to visualise the interface. The user interface should complement the product and company branding. Embedded software is a significant user touchpoint and it should be consistent with the company’s image.

The design team should also consider the following during the ideation phase:

  • Navigation and organisation of information
  • Color schemes and contrast
  • Font styles and sizes
  • Iconography and graphics

The type of display technology used should also be a consideration as it is a major component of the user experience. A small TFT screen may not be suitable for displaying detailed information, while a larger OLED display may be able to communicate a greater quantity and complexity of data.

Similarly, a display with poor colour accuracy or low contrast may affect the user’s ability to read and interpret information.

Step 3: Prototype

The prototype phase involves creating a preliminary version of the interface to test its functionality and usability. This can be achieved by using rapid prototyping tools to create interactive mockups.

During this phase, you should focus on the following:

  • Navigation flow and user interaction
  • Screen layout and composition
  • Iconography and typography
  • Consistency in design elements

Step 4: Test and evaluate the UI/UX 

The final step in designing an embedded UI/UX is to test and evaluate the interface. This involves conducting user testing to ensure that the interface is easy to use and meets the need it was intended for. It is essential to gather feedback from users and incorporate their suggestions into the final design iterations. 

Final thoughts 

Designing a UI/UX for an embedded system requires careful consideration of the user’s needs, the UI/UX architecture, and the display technology. By following the four steps outlined in this blog post, developers can create an effective UI/UX that meets the user’s needs and enhances their experience. Display technology plays a crucial role in every step of the process, and it is essential to choose the right display technology for the specific application to ensure a successful outcome.

At 4D Systems, we understand the importance of choosing the right display technology for the specific application. We offer a range of display technologies with varying features and specifications, such as capacitive touch, sunlight readability, and wide temperature ranges. We can help you create an effective and intuitive UI/UX design for their embedded system.

11 05, 2023

OLED – Choosing the best display for your application 

2023-07-27T19:10:49+10:00Categories: Display Technologies|Tags: |

Display Technologies Demystified: A Guide to Choosing the Best One 

In today’s world of technology, displays play a vital role in many applications. From smartphones to medical devices, displays are everywhere. The type of display chosen for an application can significantly impact the user experience, power consumption, and overall device performance. 

However, with the plethora of display technologies available today, it can be overwhelming trying to discern the key differences and which display is best for your application or project.

OLED technology is suitable for a wide range of applications due to its unique properties. In this blog, we explore the different types of OLED technology, compare OLED to other display technologies such as QNED and LED, and discuss its applications.

What is OLED? 

OLED stands for Organic Light Emitting Diode. An OLED display consists of several layers of organic material sandwiched between two electrodes. When an electric current passes through these layers, it emits light. OLED technology has several unique features, such as high contrast, wide viewing angles, and fast response times. OLED displays can also be made very thin and versatile, which means it is relatively easy to produce flexible and transparent displays.

OLEDs enable emissive displays, meaning each pixel is controlled individually and emits its own light. In comparison, LCDs involve the light coming from a backlighting unit). OLED displays feature great image quality; rich colours, fast motion and high contrast. They are well known for producing “real” blacks, which other displays (such as LCDs) have difficulty replicating due to backlighting. 

OLED Display Screens 

Similar to other types of displays, OLEDs have the ability to showcase images, text, video, and other content on a screen or panel of varying sizes and resolutions. They can be used in applications ranging from small displays, such as those in wearables, to larger displays, used in TVs. 

In recent years, OLED technology gained popularity in the high-end home entertainment market due to its exceptional power and performance. OLED screens are also being used more frequently as performance display tools in various industries, highlighting their versatility and usability.

OLED displays can have a resolution of up to 8K, with a pixel density of up to 1000 pixels per inch (PPI). OLED displays can also be produced on flexible substrates, which makes them suitable for conventional, curved or foldable displays.

There are different types of OLED displays, such as passive matrix OLED (PMOLED) and active matrix OLED (AMOLED). PMOLED displays have lower power consumption and are suitable for small displays, while AMOLED displays have higher resolution and faster response times, making them suitable for larger displays.

OLED vs LED 

An older technology, LED displays are still frequently used in many applications, such as outdoor screens, scoreboards, and other informational displays. LED displays use a backlight to illuminate the pixels, while OLED displays emit light directly. 

However, OLEDs are demonstrated to be superior to LEDs for a vast majority of use cases. Some of the advantages of OLED over LED displays include:

  • Higher contrast – OLEDs can display very deep, rich blacks and tonal shades because they emit no light when instructed to display dark areas, while LCD types including standard LED panels can’t achieve the same contrast ratios, resulting in less deep and crisp blacks due to backlight bleed. OLED displays have a contrast ratio of up to 1,000,000:1, which is much higher than traditional LED displays.
  • Richer colours – OLED displays have a colour gamut that covers more than 100% of the DCI-P3 colour space, which is higher than most LED displays.
  • Faster response times – OLED displays have better response times than LED/LCD panels, achieving response times in as little as 1 millisecond. This makes OLEDs better at displaying images in rapid motion with less noticeable artifacting, while LEDs struggle due to illuminating multiple pixels behind an LCD layer.
  • Wider viewing angles – OLEDs emit light directly to the screen without having to pass through a liquid crystal layer like standard LED displays, which can cause refraction and odd viewing effects from acute angles. 
  • Better power efficiency – OLEDs only illuminate the necessary pixels, while LED displays require a constant backlight.
  • Lifespan – OLED displays have a lifespan of around 100,000 hours, which is significantly longer than traditional LED displays.

ULED vs OLED 

ULED stands for Ultra Light Emitting Diode – a term coined by Hisense as part of its marketing strategy. At its foundations, however, ULED is still LED/LCD with more advanced display technology. 

OLED remains a superior display choice for several reasons:

  • Response time – OLED displays have a response time of 0.1 ms, which makes them excellent for displaying fast-moving content with no noticeable motion blur. ULED displays, on the other hand, have a response time of around 5 ms.
  • Viewing angle – OLED displays offer a wide viewing angle of up to 178 degrees, which means the image quality remains consistent from almost any angle. ULED displays, however, can suffer from colour and contrast degradation when viewed from certain angles.
  • Colour Gamut – OLED displays can produce a wider colour gamut than ULED displays, covering over 100% of the DCI-P3 colour space. ULED displays can typically cover around 90% of the DCI-P3 colour space.
  • Power Consumption – OLED displays are more power-efficient than ULED displays because they only require power for the pixels that are illuminated. ULED displays require constant backlighting, which can lead to higher power consumption.

QNED vs OLED 

QNED stands for Quantum Dot NanoCell LE – a display technology developed by LG. 

QNED displays use a combination of quantum dots and, again, LED backlighting. QNED displays have a higher peak brightness than OLED displays, however there are several more factors that need to be considered when deciding whether OLED or QNED is the better fit for your project:

  • Viewing angle – While OLED displays have a viewing angle of 178 degrees, QNED offers a reduced 160 degree view.
  • Response time – OLED displays have better response times than QNED displays. OLED displays have a response time of 0.1 ms, which makes them excellent for displaying fast-moving content with no noticeable motion blur. In comparison, QNED displays have a slower response time.
  • Contrast – OLED displays have higher contrast ratios than QNED displays. OLEDs can display very deep, rich blacks and tonal shades because they emit no light when instructed to display dark areas, while QNED panels can’t achieve the same contrast ratios due to their reliance on LED backlighting.
  • Power consumption – QNED uses 100 – 400 watts, compared to just 50 – 200 watts by OLEDs. OLED displays are more power-efficient than QNED displays because they only require power for the pixels that are illuminated, while QNED displays require constant backlighting, which can lead to higher power consumption.
  • Colour range – The biggest difference between QLED and OLED is independent dimming control. While QNED TVs have dimming zones, they still use dimmable light bulbs. The organic, carbon-based materials of OLEDs can produce a wider array of colours or no colour at all.

OLED applications and use cases  

Their slim and flexible design, low power consumption and high visibility make OLED displays the first choice fo a range of use cases and applications, including:

OLED technology has a wide range of applications due to its flexibility, thinness, and high image quality. Here are some examples of use cases and applications for OLED:

  • Televisions: OLEDs offer excellent image quality, including deep blacks, vibrant colours, and wide viewing angles. They also have a slim design and can be made in large sizes, making them popular for home entertainment.
  • Mobile Devices: OLED displays are used in many high-end smartphones, including Apple’s iPhone and Samsung’s Galaxy series. They offer high resolution, excellent colour accuracy, and low power consumption, which helps to extend battery life.
  • Wearables: OLEDs are commonly used in smartwatches and fitness trackers due to their low power consumption, thinness, and flexibility. They can also be used for curved displays, which are growing in popularity.
  • Virtual Reality: OLED displays are well-suited for virtual reality headsets because of their high refresh rates, low latency, and ability to display deep blacks, which can enhance the overall immersive experience.
  • Automotive: OLEDs are increasingly being used in car dashboards and infotainment systems due to their high brightness, wide viewing angles, and energy efficiency. They can also be curved or flexible, which allows for more creative and customisable designs.
  • Lighting: OLEDs can be used for flat panel lighting applications, such as task lighting, ambient lighting, and decorative lighting. They offer a soft, diffused light that can be customised for different colours and brightness levels.

Final thoughts 

OLED displays are the definitive choice for a wide range of applications, including consumer electronics, medical equipment, and industrial applications. 

With their superior high contrast, unparalleled wide viewing angles, lightning-fast response times, and low power consumption, OLED displays provide the most optimal solution for your display needs. The versatility and rich colour gamut make OLED displays the ideal option for almost every industry and application. 

If you need assistance in choosing and integrating the best OLED technology for your project, contact us at 4D Systems, and our team of experts will help you find the perfect OLED display module for your specific requirements.

16 07, 2021

Smart Display Solutions Enhance Lifestyle Choices, Health and Safety

2023-07-27T19:15:07+10:00Categories: UX/UI|Tags: |

Touchscreens form a significant aspect of the way we view and interact with the world. Most of us interact with digital displays and touchscreens multiple times daily.

Banks, fast-food outlets, public transport, shops and many more such services rely on touchscreens for efficient operation, providing us with an easy-to-use and adaptable interface. Similarly, our home appliances and wearables commonly feature touchscreens through which we make health, work and lifestyle choices. 

Predictive and Non-Predictive Possibilities

The key word is choice. Digital technology heavily relies on automation, and that is due to predictive nature of most digital function. Predictive functions are best achieved through automation. For example, a sensor in a room can automatically send a signal to the lighting system to “wake up” and light up the room as soon as it detects a human entering the room if the room is dark. That is predictive. 


What if, however, the person wants the light to be romantically dimmer? This is a choice that a person can make and is non-predictive. It therefore requires a human input for such a choice. There are many ways humans can interact and input their choices into the digital ecosystem. Touch and voice are the most common methods to input non-predictive human choices. 

The most discrete methods still is touch: touchscreens that display an array of choices that one can quietly make without announcing one’s choice to the rest of the people in the room: privacy and choice are still amongst the most important personal liberties we are not easily going to give up any time soon! And this is mainly why OEMs of smart lifestyle products are increasingly purposing their products with smart display solutions utilising sensors, IOT, and of course touch that enhance lifestyle choices. 

Human Centred Design by 4D Systems

4D SYSTEMS is committed to enhance lifestyle choices through its smart display solutions. 4D display solutions provide touch responsive options right at your fingertips that places the ability to make non-predictive choices at the centre, in addition to any type of predictive automations that digitally driven products need. From water dispensers and toasters, to smart wearables and smart home solutions, our Gen4 series of smart display modules are amongst one of the many array of display modules, just as our pixxiLCD series where size maters.

We do automations via our display modules extremely well and at the highest standards; but we incorporate Human Centred Design (HCD) with artful creativity that enhances lifestyle choices, helping make human intelligence smarter through our display solutions. 

Safety, Health and Maintenance Advantages

Display screens, particularly touchscreens, are a better solution than knobs and buttons in the new normal due to a stark increase in infectious diseases such as COVID-19. Although the risks of infection from surfaces is low, display screens offer clear advantages that promote better health and safety standards. 

Here are five key advantages of incorporating display screens into OEM products, e.g., home appliances like water dispensers and toasters and home, and wearables for healthy living and for monitoring purposes:

  1. Display screens are easy to clean and disinfect, as opposed to knobs and buttons. All 4D SYSTEMS’ screens are disinfectant-safe and accept wipeable films to be installed if needed. Early types of machines and appliances with buttons are difficult to clean or disinfect because they provide an uneven surface with small gaps which are not easy to reach, and possibly avoided, during cleaning. Touchscreens, on the other hand, provide a flat and even surface which allows for easy and thorough cleaning in both commercial as well as home settings. Click here for a good resource from Centres for Disease Control and Prevention.
  2. Public touchscreens help reduce close contact in times where physical distancing in public spaces is necessary. Touchscreens can greatly reduce , or even eliminate, the need for face-to-face interaction with customers and help everybody maintain reasonable physical distancing recommended by the government. When used in conjunction with effective hygiene control, this can prove a much safer alternative to normal customer interaction for many commercial sectors. Check with our support staff for more information on our screens and safety recommendations.
  3. Display screens reduce repair and maintenance costs, because knobs and buttons either break or malfunction more frequently. Associated with cleaning, common problems that contribute to malfunction of buttons and knobs are dirt and grime as well as regular use. Display screens overcome such problems and offer a better value that allows equipment and appliances to also last longer. Reduced maintenance – both cost and time – as well as longer functional life directly and positively impact ecological sustainability. 4D SYSTEMS is committed to high standards for its products, especially connected to environmentally responsible solutions, and that is why it is an ISO-9001 certified company and undergoing current attainment of both ISO-14001 and ISO-26000 certifications.
  4. Display screens reduce the overall cost of equipment and appliances by allowing human interaction through touch and thereby resolving the problem of having an overwhelming number of mechanical knobs and controls. This is one of the reasons that the car industry is fast adopting touchscreen solutions over mechanical controls. According to the market research firm, IHS Markit for example, approximately 98% of all cars to be sold in USA already had touchscreens as of last year. And that is just the car industry, in USA alone! Similar trends are seen in home appliances and other lifestyle products.
  5. Display screens combine all of the above in stylishly aesthetic manner, and 4D display solutions help engineers of equipment and appliances turn technology into art. Human Centred Design is a cornerstone of 4D SYSTEMS’ philosophy for Excellence, and design aesthetics is something we place a strong emphasis on alongside our commitment to high quality display solutions that can help make human intelligence smarter. 

4D SYSTEMS is a crucial bridge between digital automation and choices that humans make and enjoy through tis smart display solutions that is incorporated into smart lifestyle products within commercial applications and as easily in home appliances and personal wearable applications. 

Contact 4D SYSTEMS enterprise solutions team who will help you turn your technology into art that enhances lifestyle choices, health and safety.

8 10, 2020

Educational Primer Series: What is Pulse Width Modulation?

2023-09-29T19:59:48+10:00Categories: Display Technologies|Tags: |

Our Educational Primer Series presents a deep dive into the technical elements that bring together the world of 4D Systems and what we have to offer. You’ll find that this information series, developed with our experts and engineers, is the perfect place to power up your knowledge and take your understanding of our hardware and software to the next level. As always, feel free to reach out and get in touch. The best learning is interactive and we’d love to hear from you.

File Downloads

What is Pulse Width Modulation?

Have you ever wondered how computers dissipate the amount of heat that gets generated by the CPU and other components? Compact electrical fans have been used for better ventilation and for cooling PCs. However, as fans produce noise levels that increase with the rotation speed, different methods were explored to control the speed of the motor and to ultimately quieten it. In recent years, the technology of controlling the power’s output has evolved significantly. Researchers have been looking for methods where a microcontroller or a switch would constantly control the amount of power a motor delivers, as mentioned in the above case, the fan in a PC.

So what is PWM and how does it work? And what are the ways to use the PWM outputs on your intelligent display?

What is PWM?

Pulse Width Modulation (PWM) is a method used for controlling an analogue signal using a digital source. The output voltage of the converter is controlled by modulating the width of the pulse. A lot of power electronic circuits are controlled by PWM signals of various forms.

How does PWM work? 

A PWM signal consists of a duty cycle and a frequency. The duty cycle is the amount of time in which the signal is active or is in a ‘high’ or ‘on’ state. The duty cycle is expressed as a percentage or ratio of the total time it takes to complete one cycle. The frequency is calculated by finding out how fast the PWM completes a duty cycle. In other words, it means the frequency is determined how fast it switches between high and low states. By steering a digital signal off and on at a fast rate and at a particular duty cycle, the output will perform like a constant voltage analogue signal when providing power to devices.

The energy is distributed through a series of pulses rather than a continuously varying signal. By increasing or decreasing pulse width, i.e. how long the digital signal is held high, the energy flow to the motor shaft can be controlled.

PWM is found in a wide variety of applications, ranging from control circuitry to telecommunications to servomechanisms to power delivery and as an efficient voltage regulator.

Let’s take a look at the ways to use the PWM outputs on your intelligent display.

Dimming the LED backlight

One of the most popular applications of PWM is controlling the brightness of LED and LCD displays. The majority of LCD displays contain a LED backlight. LED lighting is used due to its efficiency, life span, and energy saving properties. Because the brightness and colour of an LED can affect the display, the LED lighting system requires an application to adjust the brightness and colour at the same time. PWM can be used to control the brightness level of the LED by turning the LED on and off at a specific rate. The naked eye cannot see these rapid oscillations of light, so even when the light is off we see the light as on.

Controlling the brightness of the display in laptops

Following the same principle, PWM is also used to regulate the brightness of the display in laptop monitors. When a monitor is set to maximum brightness the LEDs are glowing at full strength. If you reduce the brightness to 50%, the light intensity is lowered by inserting small pauses where the LEDs turn on and off for a very short time. When you reduce the brightness setting further, the pauses become longer, reducing the brightness further.

Controlling the speed of a fan (DC motor) in the CPU

As mentioned in the introduction, PWM can also be used to control the speed of a motor by regulating the
amount of power delivered. PWM speed control works by driving the motor with a series of on and off pulses and
varying the duty cycle of the pulses while keeping the frequency constant. It operates like a switch that constantly
cycles on and off, thereby regulating the speed of the fan.

Varying the width of these pulses can control the power applied to the motor and thereby varying the average DC
voltage applied to the motor’s terminals. By modulating the timing of the pulses, the speed of the motor can be
controlled. So longer the pulse is on, the faster the motor will rotate and the shorter the pulse is on, the slower
the motor will rotate. PWM operates like a switch that constantly cycles on and off, thereby regulating the speed
of the fan.

PWM has emerged as a solution for a wide variety of applications.

For a great range of LCD screens, visit: www.4dsystems.com.au/products/

9 09, 2020

Educational Primer Series: What is an Intelligent Display Microcontroller?

2023-09-29T22:55:53+10:00Categories: Display Technologies|Tags: |

Our Educational Primer Series presents a deep dive into the technical elements that bring together the world of 4D Systems and what we have to offer. You’ll find that this information series, developed with our experts and engineers, is the perfect place to power up your knowledge and take your understanding of our hardware and software to the next level. As always, feel free to reach out and get in touch. The best learning is interactive and we’d love to hear from you.

File Downloads

What are intelligent display microcontrollers?

Have you ever wondered how your TV’s remote device controls the channel selector, speaker volume or colour adjustments of your TV? Or how your car engine maintains the desired fuelling and ignition. Or how the display unit keypad on your kitchen gadgets can execute a command that can turn the gadget on and off. What is that component that first gathers information then processes it and finally outputs a certain action based on the information gathered?

Microcontrollers are ruling our lives. There is hardly any electronic device that comes without at least one microcontroller, and usually there are several – there is one microcontroller for the user interface and another to control the motor and so on. Whether you’re driving your car, scrolling your computer screen, opening your garage door or heating a cup of water in your microwave oven, there is one component that is in common. Microcontrollers are widely used in various applications and different devices.

What are microcontrollers?

TI (Texas Instruments) engineers, Gary Boone and Michael Cochran, created the first microcontroller in 1971. As the name indicates, microcontrollers are single integrated circuits (IC) that are designed to control one task and run one specific program. These single-chip microcomputers are also known as embedded controllers because they are often embedded into the devices they control; like automatically controlled electronic devices such as smartphones, cameras, microwave ovens, washing machines, etc. The microcontroller can be seen as a minicomputer and has the same components a computer possesses – a processor unit (MCU), memory, serial ports and a few peripherals.

Advantages of a microcontroller:

  • Small and flexible – can fit inside other devices.
  • Cost-effective.
  • Energy efficient – the processor chips consume less power because less time is required for performing an operation.

  • Versatile – used in almost all types of electronic equipment, computer systems, etc.
  • Better code density – microcontroller ensures that the code fits even into the smallest memory.
  • The microcontroller is easy to interface without any extra circuitry.

  • Even without any digitals parts, it can be used as a microcomputer.

  • Microcontrollers are easy to use.

  • It is easy to troubleshoot the issues and the system is simple to maintain.

Interfacing microcontrollers with intelligent displays

Many electronic gadgets that are frequently used in our day-to-day life integrate microcontrollers with an appropriate external device to perform many special tasks. This process of connecting devices together so that they can exchange information is known as interfacing.

Here data or information is transferred between the microcontrollers and interfacing peripherals. There are different types of interfacing peripherals like LCD displays, LEDs, ADC, sensors, keypads, microprocessors, motors, external memories and other devices. Interfacing has been able to resolve many complex glitches in circuit designing.

Intelligent displays have been around for a long time and many fields are adopting touchscreens and touch panels for applications with computer interfaces. As intelligent displays offer a more natural interaction that humans are used to, it also offers a great advantage over conventional tracking methods like a keyboard or mouse.

Display options for interfacing microcontrollers

A few of the intelligent display options available for microcontrollers are LCD, LED and OLED. An LCD uses a backlight made of either CCFL or LEDs. An LED display uses LED backlighting, and an OLED emits light to LEDs and does not require a separate backlight.

LCDs have been used to display output messages for many automated devices ranging from microwave ovens to washing machines to cell phones to televisions, to monitors and other similar devices. Liquid crystal, as the name suggests, is an organic substance that is found in both the liquid and crystal molecular form. Liquid crystals are placed between transparent electrodes, which are covered by polarisation filters. In the presence of an electric field, the liquid crystals tend to untwist which blocks the light coming through the filters. This makes the screen or part of it look dark. When the light passes through both filters, the screen looks lighter in colour.

LCDs are reasonably priced, easily programmable and they have no limitations of displaying special characters, graphics and multiple lines of information. It consists of a command register and a data register. While the command register stores the command instructions given to the LCD, the data register stores the data to be displayed on an LCD. A command could be any instruction like initialising, clearing the screen, setting the cursor posing or controlling the display.

Microcontrollers have played an important part in the technological revolution that has shaped our fastpaced lives. With the IoT (Internet of Things) rapidly increasing and with data constantly being gathered, microcontrollers are going to be a huge part of the future modern world.

For a great range of LCD screens, visit: www.4dsystems.com.au/products/

3 09, 2020

Educational Primer Series: Avoiding Burn-in on an Intelligent Display

2023-09-29T20:00:19+10:00Categories: Display Technologies|Tags: |

Our Educational Primer Series presents a deep dive into the technical elements that bring together the world of 4D Systems and what we have to offer. You’ll find that this information series, developed with our experts and engineers, is the perfect place to power up your knowledge and take your understanding of our hardware and software to the next level. As always, feel free to reach out and get in touch. The best learning is interactive and we’d love to hear from you.

File Downloads

Avoiding burn-in on an intelligent display

Have you ever been bewildered by the ghost-like images or discolouration that appears on your phone screen, LCD monitor or any other intelligent display screens? You must have also noticed that these stubborn images are mostly found around the areas which have been constantly used or where images have been constantly projected, for example, navigation buttons on a phone or a channel logo on a TV channel.

This phenomenon is known as a screen burn-in.

So what is a burn-in? How is it caused? What should you do to avoid burn-in on an intelligent display?

Let’s find out.

What is burn-in?

Burn-in is a visible mark that is left on an intelligent display and remains there even if the content changes on the display. In other words, it appears as if the images were permanently burned-in onto the screen, hence the name burn-in. The burn-in could be in the form of an image outline or a text outline or a discolouration.

How is a burn-in caused?

The continuous display of static images over an extended period of time can create a permanent shadow or ghost of that image on the screen.

The common instances where you might find a burn-in on your intelligent display are:

  • Channel logos from TV channels
  • Navigation buttons or notification bar on your smart device
  • Certain icons or banners on gaming console monitors

Let’s take a look at a more technical explanation for burn-in:

The images on an intelligent display are made up of thousands and thousands of picture elements or pixels. Each pixel is composed of three sub-pixels – red, blue, and green – which blend together to form various shades of colours. However, with time and prolonged use, the sub-pixels age and lose their intensity. Also, the sub-pixels have a varying lifecycle and do not age at the same rate. For example, the red pixels have the highest luminous efficiency, followed by the green and then the blue. Low luminous efficiency means that the blue pixels require more electricity to achieve the same level of brightness as the red or green one. The higher current causes the blue pixel to degrade faster, shortening its lifespan. This causes the blue pixel to not glow as brightly as the other two pixels. And this gradually shifts the colours of the screen in one area more than in other, leaving what looks like a ghost image or a discolouration behind.

How to avoid a burn-in?

Burn-in makes the intelligent display screen start to look really bad. Let’s take a look at the few steps you can do to avoid a burn-in on an intelligent display.

  • Lower the brightness of your screen

Lowering the screen’s brightness will improve the life of the display. LEDs wear out when they are being used and more brightness means more current. It is best to keep the brightness lower than 50% to minimise the risk of a burn-in.
  • Turn down the amount of time that your screen stays on

Lowering the screen timeout not only saves battery life but also prevents a screen burn-in. Also using a black or moving screensaver lessens the chance of potential image retention issues. Turn the display off when you’re not using the device.

  • Use the sleep timer
Set the sleep timer if you are likely to fall asleep in front of your TV or bedroom smart display. This is to make sure that the screen does not stay on all night and damage your display.
  • Change the wallpaper to black

Using a black wallpaper instead of bright wallpapers will not only solve the problem of burn-in but will also improve the battery performance of your device.

  • Avoid leaving static images on

Change the screen content frequently. If there is a static image such as a logo or, say, a channel number on the screen, it is likely to get burned-in. The same goes for camera surveillance type systems. Turn the screen off or change to a different input and display every now and then to help keep the image from getting burned-in.
  • Use an immersive full-screen mode

Change to an immersive full-screen mode if available. This will remove the top and bottom bars.

  • Remove any static navigation icons

There are certain applications that can remove the navigation bar and add it back when needed.

  • Keyboards with a darker theme

Use on-screen keyboards that have a darker theme. This is to prevent colour degradation in the lower half of the
display.
  • Avoid using certain display filters

Avoid using display filters that could accelerate a burn-in.

Once the burn-in has come into effect, it cannot be repaired. However, it can be slowed down and the visibility of the ghost images can be lessened. Take a note of the above-mentioned points to avoid burn-in on an intelligent display.

Once the burn-in has come into effect, it cannot be repaired. However, it can be slowed down and the visibility of the ghost images can be lessened. Take a note of the above-mentioned points to avoid burn-in on an intelligent display.

Title

Go to Top